Kyle Pericak
"It works in my environment"
The objective of this project is to build a technology blog website, satisfying the following requirements:
- Affordable: The website should cost as little as possible to maintain
- Maintainable: Authoring and updating content on the website should be simple and fast.
- Extensible: This is a software developer's website. It needs to enable custom code so fun features can be built into it.
- Custom Domain: Some free/cheap blog options require a custom FQDN suffix,
such as
x.wordpress.comsites. This blog needs to work with any domain name. - Fun: The blog needs to use technologies that are current and interesting.
Project Posts & Progress
This project includes, or will include, the following posts. If any aren't finished, check back later!
| Date | Article |
|---|---|
| 2019-08-01 | Building a Pelican Docker image |
| 2019-08-03 | Writing blog content for Pelican |
| 2019-08-04 | A simple Pelican development environment |
| 2019-08-05 | Saving Docker images in Google's Container Registry |
| 2019-08-06 | Google Cloud Build with GitHub Trigger |
| 2019-08-09 | Hosting a website using Google Cloud Storage |
| 2019-12-02 | Using Cloudflare to provide HTTPS |
Design & Workflow
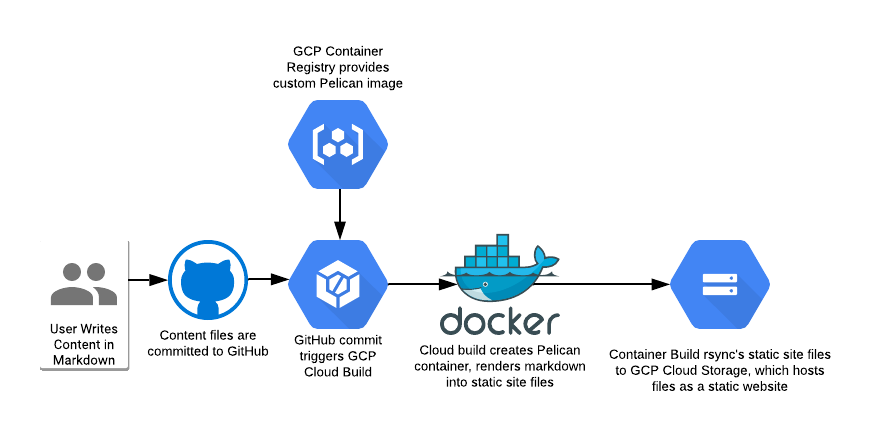
At a high level, with this setup you just write your content and push it to git. The rest takes care of itself.
Here's how it works:
- Blog content is written as text in markdown files. I use Vim.
- When the content is ready, code is pushed to a GitHub repository.
- A Google Cloud Build trigger watches for commits. When one happens, it loads the Git master branch to its temporary workspace.
- Cloud Build loads a pre-created Pelican Docker image is from Google's Container Registry, and executes it against the markdown files to generate a static website's .html and .css files.
- Cloud Build uses an rsync image to transfer the files to a Google Storage bucket.
- Google Storage hosts the static site files on a custom domain as a website.

Setup: Configuring Pelican and GCP
Pelican Theme
Before Pelican can render the markdown files into a site worth looking at, it needs a theme to work with.
The easiest way to go is to select a pre-made theme.
Personally, I forked a theme then heavily modified it. Forking the theme prevents it from changing, and lets you change things as needed. I'd suggest creating a fork of the theme even if you won't change it.
Pelican Docker Image
Containerize Pelican
Next, the pelican software needs to be containerized for Cloud Build to use it. You can either grab an existing image, such as the one I've shared on Docker Hub, or build your own.
How to build a Docker image for Pelican
Push Pelican Image to GCR
The Pelican image needs to be in the Google Container Registry for Cloud Build to use it. GCR is like Docker Hub, but private and not free. It's pretty affordable.
Development Environment
Google Storage's website hosting feature is great, but it has a cache that I haven't yet figured out how to bypass. This means that if you push a mistake to the storage, then push a fix, the fix may not display for like an hour.
To get past this, using a local service for development is a nice solution. Also, this way you're not testing your code in production.
You can see the utility script I made here,
but basically you just run a local Pelican image, then run pelican against
your content files with --listen and --autoreload.
Pelican Website: Local Development Environment
Cloud Build
Google Cloud Build is the automation framework used to watch for changes committed to github, then transform the content files into a website and save them to Google Cloud Storage.
Configure Cloud Build to watch for commits to the master branch of the blog content repository, then run the pelican and rsync jobs against it.
Google Cloud Build: Automatically Deploy Changes from GitHub
Google Storage Web Hosting
At this point, you've written your content, converted it into web files, and synchronized those files with Google Cloud Storage. To make the website accessible, you need to configure Google Cloud Storage to host the content as a website. This step is also where you point your custom domain name at the new site.
Google Cloud Storage: Static Website Hosting
Secure the site with HTTPS
These days there's really no good excuse to not have HTTPS on your site. On a self-hosted site I usually use LetsEncrypt, but for this static site instead I've used the built-in HTTPS feature of CloudFlare's free CDN solution.
