Created: 2019-08-03Updated: 2019-08-03
Writing Blog Content for Pelican
What is Pelican
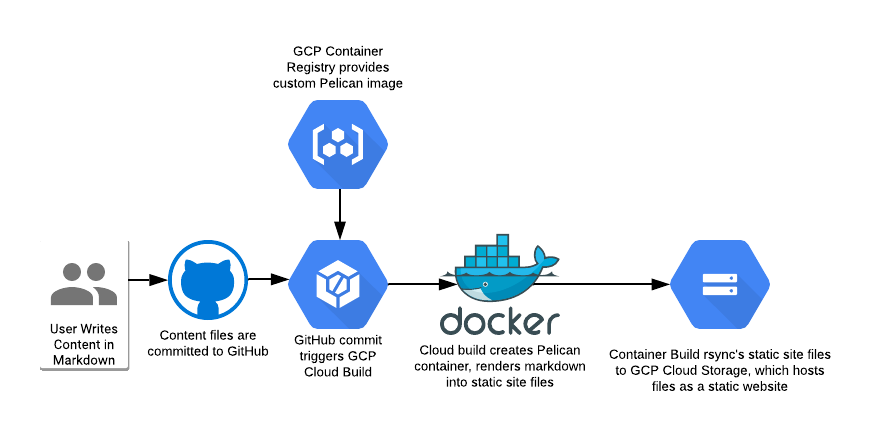
Pelican is a free and open source static website generator. It takes a collection of files written in Markdown as its input, applies a theme and configuration, then outputs a full static website.
A static website is a collection of HTML and CSS files that don't need any database or back-end programming language. These websites can be hosted by any web-server regardless of language support.
Creating a Pelican Project
While not necessary, its a really good idea to make a git project to source control your blog content.
The project will hold the configuration for Pelican, which defines the plugins, variables for the style-sheet, and the site name. This project also holds all the markdown files which make up the blog content.
Project Layout
The files should be placed in a structure as follows.
- Configuration goes in the
pelicanconf.pyfile. - Blog posts go in
content/posts, and can be sorted into subdirectories. The nested directory structure has no impact on how the site is rendered. - Static pages go in
content/pages. These are handled specially by the templating engine. content/imagesstores image filesoutput/doesn't need to exist here, but it's used by the-o(output) argument in Pelican as the directory to store the generated website files. This directory should be ignored by Git.
.
+-- pelicanconf.py
+-- content/
|   +-- posts/
|       +-- first.md
|       +-- how-this-site-works/
|           +-- building-a-website.md
|   +-- pages/
|       +-- about.md
|   +-- images/
|       +-- pelican.png
+-- output/
Pelican & Markdown Syntax Reference
Post Metadata
The top of each post starts with some metadata that Pelican uses to scaffold the site.
title: Title of the post or page
summary: Detailed summary
slug: short-name-goes-in-the-url
category: whereThisWillBeSorted
tags: tag1, tag2
date: 2019-08-28
modified: 2019-08-28
status: published or draft
title: defines the string at the top of the article and in the indexsummary: used in the index pages. If not defined, a large and somewhat ugly subset of the top part of your post will auto-populate this field.slug: defines the URL from which the post page is accessiblecategory: place this post into a category, accessible from the sidebar in this particular theme.tags: a comma delimited list of indexed sub-categories. Can have many.date: When the page was authoredmodified: When the page was last changedstatus: eitherpublishedordraft. Defines whether the page is ready to be displayed to the public.
You can also define custom attributes to use in your themes. I've modified a theme to allow custom thumbnail files for the index and a blog image which look like this:
image: pelican.png
thumbnail: pelican-thumb.png
Headers
Regular text
# Big header (h1)
## Smaller Header (h2)
### Even smaller header
Horizontal Line
---
Table of Contents
Numbered List
The numbers will automatically increment.
1. First item
1. Second item
1. Third Item
Bullet List
- First Item
- Second Item
    - Nested List item with 4 spaces before the dash
- Third Item
HTML
Markdown files can also support raw HTML content, allowing you a lot of flexibility.
<table class="mytable>
  <tr><th>Header</th></tr>
  <tr><td>Cell</td></td></tr>
</table>
Links
Linked text goes in square brackets the URL in round brackets.
[A web link](https://example.com)
Images
Preview the Site
The content is ready to be converted into a website. Use a Pelican container to generate the site. The pelican container can also act as a local web server to preview changes before pushing them.
Pull the Pelican Image
Pull a pelican image from GCR or Docker Hub.
Mine is gcr.io/kylepericak/pelican on GCR and kpericak/pelican on Docker
Hub. The GCR image is private, since they charge me for the downloads.
docker pull gcr.io/kylepericak/pelican
# or
docker pull kpericak/pelican
Launch the Pelican container
Run this from the project root. It will mount the content/ and output/ directories into a new container named "pelican". It will also forward the port Pelican's web server listens on (8000) to the workstation's port 8888.
The Pelican auto-reload feature looks like maybe its multithreaded or something,
so running it as the root process of the docker container doesn't work.
Instead, launch the container with the tail -f /dev/null command so it just
idles.
docker run -d \
  --name pelican \
  -v $(pwd)/content:/content \
  -v $(pwd)/output:/output \
  -p 8888:8000 \
  gcr.io/kylepericak/pelican \
  tail -f /dev/null
Launch the local web server and auto-rebuild service
This will build the site files, launch the web server, and watch for new file changes so it can automatically rebuild.
The example docker exec command runs interactively. I like to run it in a
dedicated tmux pane to show if anything has gone wrong.
docker exec -it pelican \
  pelican \
    -s /pelicanconf.py \
    --debug \
    --autoreload \
    --listen \
    /content \
    -o /output
Browse to your site
Reference Links
Next Up
Now that the content is written, its time to host the static website on Google Cloud Storage.